요구사항
1. 슬라이더 값이 바뀌면 API 호출
2. 3초에 최대 1회 API를 호출할 것
3. API 호출만 제한하고, 슬라이더는 실시간으로 변경되어야 함.
해결과정
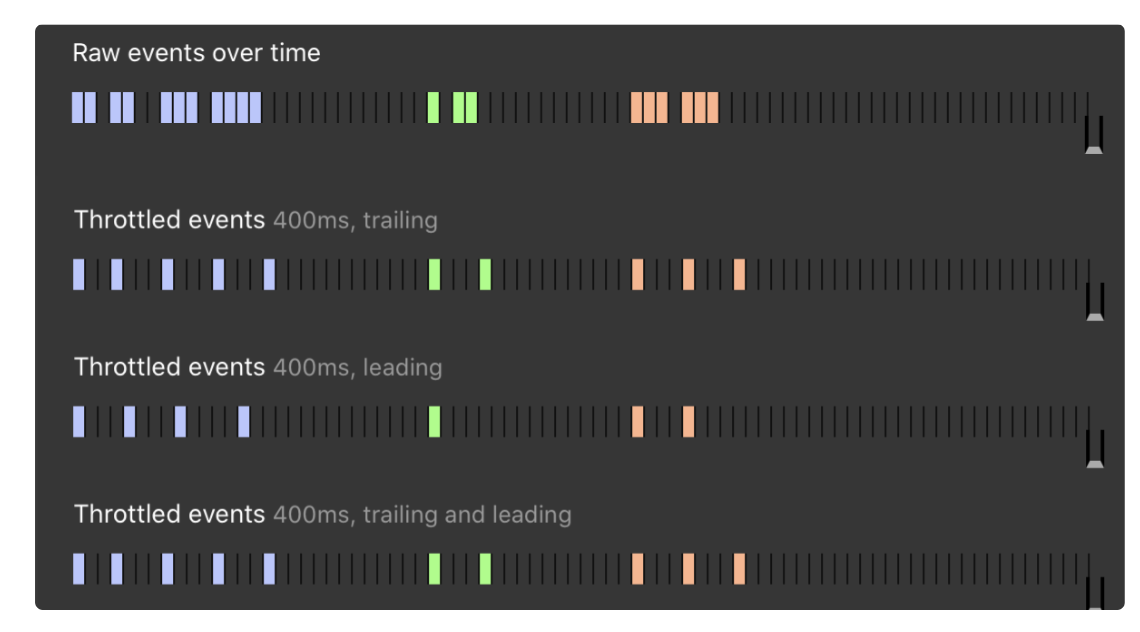
API 호출을 제한하는 일이기 때문에 자연스럽게 debounce와 throttle을 생각하게 된다.
해당 개념들을 간단히 보면,


얼핏 디바운싱이 적절할 것으로 생각했지만, 슬라이더를 이리저리 움직이고 있으면 API 호출을 전혀 하지 않게 된다.
3초에 최대 1번이 요구사항이기 때문에 디바운싱보다는 쓰로틀링이 더 적합하다.
해결 전략을 정했고 쓰로틀링을 직접 구현하고 싶어서 우선 구글링했다.
버그가 있던 구글링 코드
import React from "react";

export default function useThrottleValue<T>(value: T, delay: number = 500) {
  const [throttleValue, setThrottleValue] = React.useState<T>(value);
  const throttling = React.useRef(false);
  React.useEffect(() => {
    if (throttling.current === false) {
      setThrottleValue(value);
      throttling.current = true;
      setTimeout(() => {
        if (throttling?.current) throttling.current = false;
      }, delay);
    }
  }, [value, delay]);
  return throttleValue;
}
구글링해서 찾은 코드인데 react-query에서 사용할 수 있지만, 치명적인 버그가 하나 있는데,
슬라이더가 멈춘 뒤에 throttle 시간이 끝나지 않았다면 마지막 슬라이더 값으로 api를 재호출하지 않는 문제가 있다.
이건 위 쓰로틀링을 설명한 그림에서 보여주는 leading, trailing 개념인데 간단히 leading은 쓰로틀링 콜백을 첫 호출할 시, 쓰로틀링 딜레이를 적용할 것인지 묻는 것이고, trailing은 쓰로틀링 딜레이 사이에 들어온 호출 요청을 딜레이가 끝난 뒤에 재호출 하도록 할 것인지 묻는 옵션이다.
위 구글링 코드는 그런 개념은 적용되어 있지 않아서 쓰로틀링 코드이지만, 내 요구사항을 해결할 수 없었다.
그래서 직접 코드를 구현했다.
직접 구현한 코드 (leading, trailing 기능 적용)
import isEqual from 'fast-deep-equal';
import { useEffect, useState } from 'react';

export default function useThrottleValue<T>(value: T, throttleDelayMS = 500) {
  const [throttled, setThrottled] = useState<T>();
  const [isThrottling, setIsThrottling] = useState(false);
  useEffect(() => {
    if (!isThrottling && !isEqual(value, throttled)) {
      setIsThrottling(true);
      setThrottled(value);
      setTimeout(() => {
        setIsThrottling(false);
      }, throttleDelayMS);
    }
  }, [isThrottling, value, throttleDelayMS]);

  return throttled;
}
import { LoanInterest } from 'constants/interface';
import { convertLoanInterest } from 'constants/utils';
import { useQuery } from 'react-query';
interface Props {
amountWon: number;
throttleDelay: number;
skip?: boolean;
}
function useLoanInterest({ amountWon, throttleDelay, skip }: Props) {
const throttledQueryKey = useThrottle(['loan-interest', amountWon], throttleDelay);
const { data, isLoading } = useQuery<LoanInterest>({
queryKey: throttledQueryKey,
queryFn: key => requestLoanInterest(key?.queryKey[1] as number),
enabled: !skip && Boolean(throttledQueryKey),
staleTime: Infinity,
cacheTime: Infinity,
});
}
export default useLoanInterest;이렇게 구현해서 원하던 leading과 trailing 기능을 담은 throttling을 구현했다.
추가로 라이브러리의 도움을 받으면 더 쉽게 구현할 수 있다.
lodash의 throttle 메서드를 이용하여 구현한 코드
interface Props {
  amountWon: number;
  throttleDelay: number;
  skip?: boolean;
}

function useLoanInterest({ amountWon, throttleDelay, skip }: Props) {
  const [value, set] = useState<any[]>();

  const throttledQueryKey = useMemo(
    () =>
      _.throttle(
        (amountWon: number) => {
          set(['loan-interest', amountWon]);
        },
        3000,
        {
          leading: true,
          trailing: true,
        }
      ),
    []
  );

  useEffect(() => {
    throttledQueryKey(amountWon);
  }, [amountWon]);

  const { data, isLoading } = useQuery<LoanInterest>({
    queryKey: value,
    queryFn: key => requestLoanInterest(key?.queryKey[1] as number),
    enabled: !skip && Boolean(value),
    staleTime: Infinity,
    cacheTime: Infinity,
  });

}

export default useLoanInterest;
lodash의 throttle 메서드를 이용해서 같은 기능으로 구현했다.
참고로 lodash의 throttle은 useCallback과 useMemo로 많이 구현하는데
두 방식 모두 구현할 수 있지만 useCallback으로 throttle을 호출하면 매번 내부 상태 값이 초기화 되므로
내 경우에는 useMemo를 사용했다.
'업무' 카테고리의 다른 글
| React hook 리팩토링 하기 (xstate) (0) | 2023.03.03 |
|---|---|
| IOS 웹뷰 페이지 개발 업무에서 문제 해결 과정 (0) | 2023.02.02 |
| BFF 활용하여 프론트엔드만을 위한 API 만들기 (0) | 2022.11.01 |
| requestIdleCallback을 활용한 렌더링 성능 개선 경험 (1) | 2022.10.07 |
| [Next.js] Script 추가하기 (채널톡 추가하기, next/script) (0) | 2022.09.28 |


